
So I decided to make a Fall Leaf Garland. And thought I'd share with you how I made it.
The first thing I did was cut two WOF by 4" to make my own binding type string.
I sewed the two pieces together then ironed them in half, folded them onto themselves...
 and fold again to sew. I used a zig zag stitch.
 I traced around a leaf to use as a pattern.
And you know those left over pieces of batting?
 They will work perfectly for this garland.
Cut 6" x 11 1/2" from several different pieces of fall fabric.
Fold the fabric in half, pin your pattern on the TOP piece of fabric,
and be sure that your stem is on the fold.
Cut around the TOP piece of fabric only. Then place your batting in between the folded fabric, and sure that your string is at the top of fold.....
 (showing the piece of fabric for the free form leaf)
Pin.
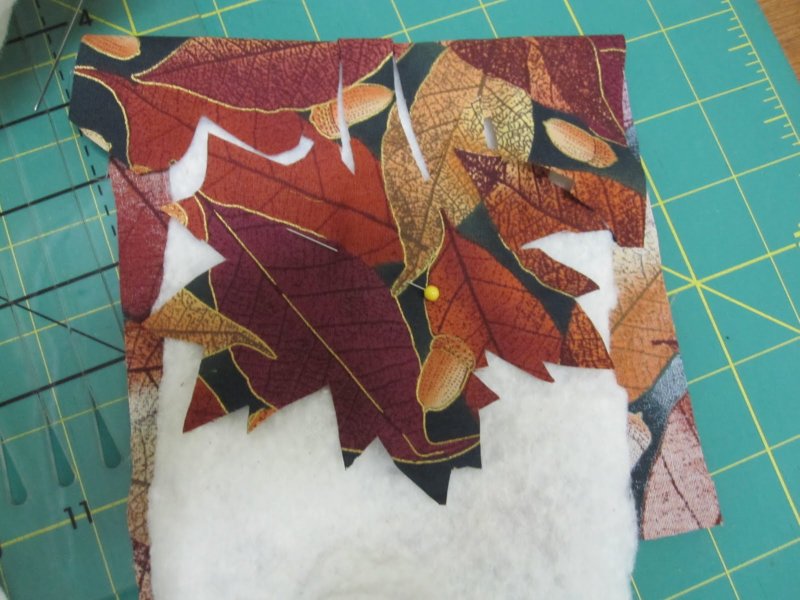 Sew around the edges of the sandwiched leaf.
 Now cut around the edges of the leaf.
 I know this is probably a pretty basic way to do this, but I wanted to show you how I made the free form leaf and how it is attached to the string. Making it two sided allows you to use the garland where both sides are finished.
 And here is the garland, decorating my mantle.
 Thanks for taking the time to view this little tutorial.
Linking up with Finished it Friday


25 comments:
What a great idea! Thankyou for sharing.
Very festive.
Wonderful idea! Thanks for sharing the tutorial.
Beautiful idea. Looks lovely on your mantle.
What a great idea!! I'd love to try this sometime. Thanks for sharing it with us.
Pretty mantle too!
How cool is that! Love the way the "string" is inside. Thanks for the tut.
Very charming Jocelyn! I LOVE it!
What a great idea! I may have to try this.
Que idea tan original, muchas gracias por compartir el tutorial, un saludo
Oh this is great and I love a tutorial because it helps me learn. I have so many things on my to do list!!!
How fun is this? I am also a quilter, and this project looks so fun. I am going to save this as a favorite. Would love to make it sometime. thanks so much for sharing! Also, thanks for visiting my blog. Now a new follower.
Lovely!
How cool is that?
That is just too darling - and I'm asking permission to use your pic so I can link to it! You are so creative girl!
Your garland is great! Love your mantle display....very pretty!
What fun -- and just what my mantel needs! But I'm not hand sewing all those!! :)
Sweet garland! And what a nice idea to have a tutorial about how to make one. Thank you!
That's an awesome little leaf garland! What a nice explaination of how you made it. Thank you so much.
WOW, this is gorgeous and your mantle is completely exquisite!!! What a beautiful display you have made!!!
XO
Cindy
Leaf garland is awesome!!! Thanks for the tutorial. It's a great decorating idea!
That is sew cute! Great job!
oh, I love it! Your fall decorations are beautiful, too. I *really* need to get going on stuff like this. Thanks for the tutorial!
Your entire mantel is just a vision of Fall and Harvest! Stopping by from {the frugal girls}.
Wow! That turned out beautifully! Thanks for the tutorial :)
Post a Comment